Monday, September 11, 2023

CONCRETE POUR


ABOVE:  concrete truck on my parking strip


ABOVE:  little wheelbarrow tractor that the concrete was poured into and then driven to the backyard to be shoveled into the wooden forms.  Concrete guys are no joke.  I would not want this job...yikes!  And it was hot out.  


ABOVE:  the concrete forms are done, the vapor barrier/insulation and wire mess installed and waiting to pass inspection before second pour...the slab.


Friday, August 11, 2023

GETTING CLOSER!


Getting closer is right!  The concrete company came out and prepped the area for the concrete pour.  Before we can pour though I had to have the plumber and electrician come out and put their pipes/conduit where they want it because once that concrete is poured, they are shit out of luck (they can still drill through the concrete but it's a terd and costs me more money.)  I passed the 'pre-pour' inspection (makes sure the foundation is going to be where it is supposed to be with regard to property lines and setbacks.)  Also passed the plumbing inspection and just waiting on the electrical inspection.  The UFER line (this is when the rebar in the foundation comes in handy) was a learning curve for me and pretty frustrating.  An UFER is what electrically grounds the entire structure (from lightening, electrical build-up, etc) and is supposed to be prepped by the concrete contractor via the rebar in the wooden forms.  Long story short, it is the concrete contractor's job to prep the area not the electricians!  The electrician comes and attaches their grounding wire to the rebar once it's prepped.  Learning so much!  Once I pass the electrical inspection, I can get the concrete poured and then starts the framing!


ABOVE:  My yard before the concrete company.


ABOVE:  Concrete guys digging the trench that will be where they pour the footings/forms for the foundation. 


ABOVE:  Big pile of dirt after digging out the foundation trench.


ABOVE:  You can see the sewer pipe (big white thing), the water pipe (skinny white tube) and the electrical conduit (grey pipe).  The green tub is covering the water shut off valve.  


ABOVE:  Here you can see the wooden form that was built in the trench.  Inside the wood form is rebar.  The plumber and electrician returned after the wooden form was created and put their pipes/conduit where they want it to enter the structure.  Now the concrete will be poured into the wooden forms.  Once the concrete is hard the wood will be removed, the dirt will be used to fill in the gaps and all that will be visible is a nice concrete wall.  The concrete company is also going to use their little backhoe and remove the dirt in the center as I am not going to have a crawl space but a concrete slab.  Why did they not dig out the center when they dug the trench?  Who the hell knows.  Everybody has their own way of doing things.  You can just make out that damn UFER line wire sticking up out of the grey conduit.   


Thursday, June 1, 2023


Whew - getting closer to starting on foundation!  Had to get the small shed in the back relocated to a new spot in the back yard to free up land space for the DADU.  My contractor and I were having a hard time figuring out how to relocate a structure.  She managed to find a company out of Bremerton who moves sheds!  Better Bilt Barns, Sheds and Storage | Washington State  

Why keep the shed and not just bulldoze or crane it out?  Well, I have put a lot of time and money into that little shed and it has, over the years, really helped out a few of my family/friends get back on their feet financially by living in it and paying cheap/affordable rent.  It has a fan club and is staying in the family!

It was interesting to watch their process and the machine they use for this very specialized procedure.

Here is the shed in its original location (came with the house) and the strange little tractor/forklift thing they used to lift it on one side.  They put blocks under it and lift it a little bit at a time making sure to go slow and not break windows or crack sheetrock.  
  

As they lift and place blocks, they install two wheels on one end (the left side now has wheels under it) and use the little tractor/forklift to move the shed.


This image shows the shed being placed in its new location (you can see the wheels they installed underneath.)  It was located on the south side of the property and now it is on the north side.  It is permanently resting on skids and concrete blocks which I am okay with.  It will settle a bit but not enough to be an issue.  I am glad there is a gap underneath it so it will continue to be a refuge for transient mammals on those wet and windy nights (nothing under there for them to destroy.)

This is where the shed used to be.  We have over the years had many small mammals take refuge from the weather and night under the shed.  I was expecting to see some, The Secret of Nimh, type of activity underneath the shed once it was moved but, alas, no burrows, dens or nests of any kind.  We did find a skull attached to a spinal column and a large pelvic bone which I took to the Burke Museum for identification.  The skull/spinal column are opossum, and the large pelvic bone is turkey (probably placed there by scavengers after rummaging through post-Thanksgiving trash.)  I will be giving them a proper burial amongst my nibble garden (blueberry/raspberry bushes.) 

Now, my contractor is getting foundation bids and working out a temporary fence system to protect the fig tree during construction as required by the city.  Once we have a foundation company picked out and we pass the 'pre-construction inspection' we are good to go with the next faze!  

Tuesday, March 14, 2023

UPDATE TIME!  Got the sewer/water and electrical lines laid into the ground!  My contractor interviewed five different plumbers and we picked the one whose bid made the most sense based on the scope of work. The scope of work required was to:

1.  Hook up a water line from the street, run it under my house then into the trench dug in my backyard and prep it for official hook up to the cottage.  

2.  Hook up the cottage sewer line to the existing sewer line which happened to end about 10 feet into my backyard.  The 10-foot line in my backyard had to be replaced though as it was the old clay tubes that are pretty much garbage these days.  It doesn't negatively affect my neighbors to the south as we do share the sewer line because my hook up spot was past the point where we start sharing (hope that makes sense).  I mention this in case anyone is inspired to do this and concerned about hooking up to a shared sewer line.  You don't need to get permission from you neighbors to do the work but should let them know so as not to be an asshole.

3.  My electrician, Bryce with RainCapConstruction, showed up and dropped his conduit in the trench before everything got buried.  The electrical still needs to get done but wanted to get the conduit in the ground so the electricians don't have to dig another trench!  

Everything passed inspection and now on to the next thing.  The plumbing company, SteadyFlow, was amazing!  They were organized, clean, efficient and charged an appropriate amount.  I highly recommend them for this type of work.  


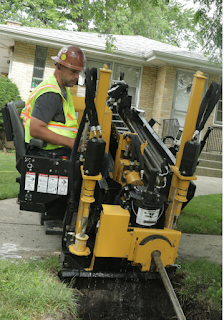
This is the machine that drilled a tunnel under my sidewalk to hook up my water from the street to my house.  I was wondering how they were going to work around the sidewalk and my front yard.  


I forgot to take a 'before' photo but this is what the yard looks like 'after' the sewer/water was installed.  You can see the hook ups/pipes sticking out of the ground in the upper right.  I had to get temporary fencing as the fence is going to have to come down and I don't want my neighbors and my dog to escape!  

Tuesday, October 18, 2022

OCTOBER UPDATE!


The city approved the cottage so we can break ground at any time!  Such exciting news.  

First thing, getting the utilities worked out.  My contractor filled me in on the process of making phone calls and having to fill out so many forms online.  Apparently, doing things by phone is outdated.  Seattle City Light (power company) needs all the info. on what type of heating unit and hot water tank I am going to install to make sure my cottage isn't pulling too much power away from the rest of the line.  The same applies to the water company.  They want to make sure my unit isn't pulling away too much water and taking away from the water source, especially from water for fighting fires.  Makes sense to me, however, I find this interesting as I have to wonder if they give a shit about how much electricity and water the fucking apt complexes are pulling.  I feel like developers get away with so much more than homeowners and our City Council blows!  Yeah, I'll get off my soapbox.

My contractor and I are hoping to be able to dig one trench (where the sewer is) and put the electrical, water and sewer in the same trench.  It would just be nice to have to dig once instead of a bunch and the neighbors and I need to replace our sewer line anyway so digging one trench makes sense.  

Once we have the utilities lined up, we can pour the concrete for the slab that will be the base of the structure.  Once those two things are done, things should go pretty quickly.  There is a list of required inspections provided by the city and the first one is to have a pre-construction inspection.  The city wants to have a look around on the property before I touch anything. I was surprised this wasn't part of the application process, so I guess application first then the inspections start.  

That's it for now.  I am going to make sure to keep my two neighbors apprised of each step as I know the process will be ass for a few months once things get rolling.   


Friday, September 9, 2022

 It's September and I have backyard cottage update!  

The first round of design corrections by the city went through and we just had to tweak a couple of things.  The architect resubmitted the design last week with corrections made and we are just waiting to hear back.  The second round also required two important factors:  1.  Name/info. of contractor.  2.  An arborist report on the trees in my entire yard plus the trees in all three backyard neighbors' yards.  

Contractor requirements:  The city of Seattle is now requiring that 'new construction' projects have a licensed/bonded/insured contractor as the city does not want homeowners hiring their dipshit cousin or building things themselves anymore...turns out too many bungles and poorly done jobs and the city is sick of it.  Can you put a contractor name/info on a 'new construction' application and then not use that person when it's time to do the project...yes.  The city isn't going to know either way once you start construction, but they want it documented for their records.  As long as the work passes inspection, it doesn't matter who actually did the work.  

I am also pleased to report that my architect, contractor and arborist are all queer women!  I am so over working with men who mansplain, egos to the moon, hit on me, hang out when they are being paid to work and otherwise make me feel uncomfortable in my own home.  Not worried about being raped by my female arborist.  If this is a shock for the men to read, then I suggest you start paying women to explain things to you about how things are for us.  I say 'pay' because our time and expertise are valuable - pretend you're paying a consultant if that helps you wrap your head around it.  Yeah, I'm calling it out.

Next, arborist report:  Turns out, the city is super anal about trees...or at least they pretend to be.  When it comes to new construction, the city wants to know where every damn tree is located - my yard and all three of my neighbors.  Why?  They don't want any construction project damaging/killing any trees, especially 'exceptional' trees.  I'm down with that.  Makes sense.  However, this also includes crappy little trees that neighbors ignore, don't arbor and are more of a nuisance than a really well cared for tree.  A maple sapling that has been allowed to grow for no other reason than laziness by a neighbor can end up being the reason a new construction project is not allowed to go forward.  My advice is, do not plant trees along fence lines as the tree itself may be in your yard but the drip line (the radius of the overhanging canopy which is where the tree gets a majority of its water intake) is hanging into your neighbor's yard and now your neighbor is screwed because the 'drip line' is where the trees drinking roots are located.  Any construction that disturbs/damages these roots will kill the tree.  Side note: only baby trees have a 'tap root'.  Adult tree roots grow out not down.  All of my neighbors, with trees in their yards, were kind enough to allow my arborist to enter their yards to measure diameter of trunks, measure canopies and document any damaged trees.  I got lucky and none of my neighbors' trees will be affected by my project!  It was close though.  The neighbor to the north has an exceptional eucalyptus tree and the neighbor to the east has an exceptional redwood but the drip lines are just barely out of harm's way even though the trees are nowhere near our shared property lines...roots grow long!  Another side note:  sometimes you will see a tree trunk being protected with a wooden barrier/box during a construction project (this is typically seen during the construction of apt complexes or major road work) and just know that the barrier/box is actually bullshit and is not protecting the trees drip line.  The contractor is getting away with something as that barrier/box should actually extend to encompass the trees canopy and isn't really protecting the tree...it's just for show.  It does protect the trunk, which is a very good thing, but a tree can survive some trunk damage but not damage to the roots where it gets its nutrients.  

Fun things:  my lady contractor was doing some research on windows and came across a really cool thing that some of you may have seen/have:  a window that turns into a balcony!   VELUX CABRIO™ Balcony Windows | Deck Mounted (veluxusa.com).  Unfortunately, the roof of our design is way too steep for this model, but the architect suggested this:  VELUX Top Hinged Roof Windows | High Knee Walls (veluxusa.com).  This design is still very nice and it's important to me that the loft space has an easement for escape in case of fire and also for ventilation.

And finally, the cottage has an official address!  Yes, there will be no A or B or 1/2, it has its own grown-up address.  This makes it feel more real to me and official as the U.S. government recognizes it (the post office).       


Monday, April 25, 2022

UPDATE TIME!


APRIL UPDATES!


It has been some time as me and my design team figure things out with regards to whether or not SIP panels are best or traditional stick construction.  Mariana, my architect, and I did visit the SIP factoring in Puyallup and learned a ton of stuff.  The walls are made of a special foam (which is manufactured across the street in another factory building from the main wall construction building which I appreciate as I prefer to buy Made in America) sandwiched between what is essentially chip board.  They glue the exterior wood and interior foam together and, viola, you have a wall.  The wall are 4 inches thick, and the roof is almost double that - heat rises and they want a thick ceiling/roof to keep the heat from leaving.  My structure only has a footprint of 240 square feet so my place would only take 3 days to make.  Image your walls, insulated and ready to go, in 3 days and require another 3 days to install on the site.  How clean and easy is that?!  I asked all of the questions that no one else had the answers to:

1.  I realize the walls are pre-built and set so can I still hang pictures or shelves?  Yes, the thickness of the walls is around 4 inches (chipboard/foam) plus the layer of sheetrock on the interior so plenty of thickness to screw in screws for hanging things without damaging the foam.  

2.  What about electrical?  Can just any electrician install a new outlet if I need an extra one later down the road that is not in the original building plan?  Yes, the foam walls are pre-installed at the factory with tubes running through them (they look like hollowed out foam swimming noodles kids use at the swimming pool.)  The tubes are located along routes within the walls that are specifically meant for electricians to cut into and pull conduit through...super easy and set up for electricians.  

3.  What if I want a new window installed someday down the road?  Will cutting into the wall effect the structural integrity of the structure?  Yes, I can have a window cut into the structure down the road.  HOWEVER, it needs to be done by a company that works with SIP paneled homes.  Not just anyone can work on these structures as they can most definitely damage a wall and fuck up the structural integrity of the entire structure and need to replace a whole wall which is expensive!  Can you imagine having to replace an entire wall of your house?  

4.  Can any contractor install these SIP panels when building a new home?  NO, you must have someone who works with this product and has been trained to install.  

5.  Plumbing?  I noticed foam tubing to run electrical conduit but what about plumbing?  Plumbing is going to be visible.  They cannot run plumbing inside the walls.  Plumbers are not allowed to cut into the walls to install plumbing.  So, unless there is cabinetry under the sinks to hide the plumbing, it will be visible.  The plumbing comes up through the floor not through the walls.  

6.  These panels are very airtight and do not breath.  Do I need to worry about mold?  No, the only area to worry about rot is the exterior.  If the exterior walls do not have an air flow between the walls and the siding, rot will occur which is bad because it isn't possible, like it is with a stick construction house, to remove the siding, cut the rot out and replace the siding.  With SIP panels you cannot cut out the rot, it will affect the structural integrity of the wall.  It is of utmost importance to hire a contractor who knows what the hell they are doing when it comes to creating that gap between the exterior wall and siding to allow airflow.  As far as the interior goes, all current construction requires internal ventilation so even though these walls are thick and do not breathe, there will be ventilation in the house somewhere required by law.

It felt good to go through the warehouse and explore the walls and the hardware.  I was actually pretty excited about SIP panels and thought I was going to go with them.  Mariana sent the factory our drawings and they returned an estimate for us.  It came in at almost $20,000 to build the walls - that is not including delivery/install.  Stick construction, insulation included, would cost almost half of that but I was really excited to have it all said and done in 3 days as I am also thinking about the inconvenience to the neighbors.  However, I then received an estimate from a contractor who works with the SIP company, and he wanted $20,000 to install the walls!  So, $40,000 for insulated walls on a 240 square foot structure so I said NO FUCKING WAY!  We are going with stick construction instead.  Yes, wood prices have gone up over the last 365 days, but I will still save a few thousand dollars that can be put into other parts of the structure. 

ESTIMATE FOR SIP PANELS CONSTRUCTION


ESTIMATE BY CONTRACTOR TO INSTALL DADU

                                                                                                HOLY SMOKES! You may be wondering if my DADU...