Wednesday, January 17, 2024
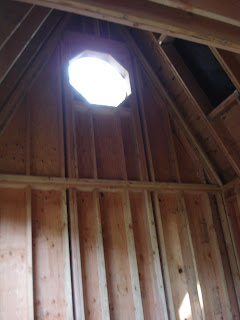
SIDING, PLUMBING AND ELECTRICAL
Monday, November 6, 2023
FRAMING!!!
Monday, September 11, 2023
CONCRETE POUR
ABOVE: concrete truck on my parking strip
ABOVE: little wheelbarrow tractor that the concrete was poured into and then driven to the backyard to be shoveled into the wooden forms. Concrete guys are no joke. I would not want this job...yikes! And it was hot out.
Friday, August 11, 2023
GETTING CLOSER!
Getting closer is right! The concrete company came out and prepped the area for the concrete pour. Before we can pour though I had to have the plumber and electrician come out and put their pipes/conduit where they want it because once that concrete is poured, they are shit out of luck (they can still drill through the concrete but it's a terd and costs me more money.) I passed the 'pre-pour' inspection (makes sure the foundation is going to be where it is supposed to be with regard to property lines and setbacks.) Also passed the plumbing inspection and just waiting on the electrical inspection. The UFER line (this is when the rebar in the foundation comes in handy) was a learning curve for me and pretty frustrating. An UFER is what electrically grounds the entire structure (from lightening, electrical build-up, etc) and is supposed to be prepped by the concrete contractor via the rebar in the wooden forms. Long story short, it is the concrete contractor's job to prep the area not the electricians! The electrician comes and attaches their grounding wire to the rebar once it's prepped. Learning so much! Once I pass the electrical inspection, I can get the concrete poured and then starts the framing!
ABOVE: My yard before the concrete company.
ABOVE: Concrete guys digging the trench that will be where they pour the footings/forms for the foundation.
ABOVE: Big pile of dirt after digging out the foundation trench.
ABOVE: You can see the sewer pipe (big white thing), the water pipe (skinny white tube) and the electrical conduit (grey pipe). The green tub is covering the water shut off valve.
ABOVE: Here you can see the wooden form that was built in the trench. Inside the wood form is rebar. The plumber and electrician returned after the wooden form was created and put their pipes/conduit where they want it to enter the structure. Now the concrete will be poured into the wooden forms. Once the concrete is hard the wood will be removed, the dirt will be used to fill in the gaps and all that will be visible is a nice concrete wall. The concrete company is also going to use their little backhoe and remove the dirt in the center as I am not going to have a crawl space but a concrete slab. Why did they not dig out the center when they dug the trench? Who the hell knows. Everybody has their own way of doing things. You can just make out that damn UFER line wire sticking up out of the grey conduit.
Thursday, June 1, 2023
Whew - getting closer to starting on foundation! Had to get the small shed in the back relocated to a new spot in the back yard to free up land space for the DADU. My contractor and I were having a hard time figuring out how to relocate a structure. She managed to find a company out of Bremerton who moves sheds! Better Bilt Barns, Sheds and Storage | Washington State
Why keep the shed and not just bulldoze or crane it out? Well, I have put a lot of time and money into that little shed and it has, over the years, really helped out a few of my family/friends get back on their feet financially by living in it and paying cheap/affordable rent. It has a fan club and is staying in the family!
It was interesting to watch their process and the machine they use for this very specialized procedure.
Here is the shed in its original location (came with the house) and the strange little tractor/forklift thing they used to lift it on one side. They put blocks under it and lift it a little bit at a time making sure to go slow and not break windows or crack sheetrock.As they lift and place blocks, they install two wheels on one end (the left side now has wheels under it) and use the little tractor/forklift to move the shed.
This is where the shed used to be. We have over the years had many small mammals take refuge from the weather and night under the shed. I was expecting to see some, The Secret of Nimh, type of activity underneath the shed once it was moved but, alas, no burrows, dens or nests of any kind. We did find a skull attached to a spinal column and a large pelvic bone which I took to the Burke Museum for identification. The skull/spinal column are opossum, and the large pelvic bone is turkey (probably placed there by scavengers after rummaging through post-Thanksgiving trash.) I will be giving them a proper burial amongst my nibble garden (blueberry/raspberry bushes.)
Tuesday, March 14, 2023
UPDATE TIME! Got the sewer/water and electrical lines laid into the ground! My contractor interviewed five different plumbers and we picked the one whose bid made the most sense based on the scope of work. The scope of work required was to:
1. Hook up a water line from the street, run it under my house then into the trench dug in my backyard and prep it for official hook up to the cottage.
2. Hook up the cottage sewer line to the existing sewer line which happened to end about 10 feet into my backyard. The 10-foot line in my backyard had to be replaced though as it was the old clay tubes that are pretty much garbage these days. It doesn't negatively affect my neighbors to the south as we do share the sewer line because my hook up spot was past the point where we start sharing (hope that makes sense). I mention this in case anyone is inspired to do this and concerned about hooking up to a shared sewer line. You don't need to get permission from you neighbors to do the work but should let them know so as not to be an asshole.
3. My electrician, Bryce with RainCapConstruction, showed up and dropped his conduit in the trench before everything got buried. The electrical still needs to get done but wanted to get the conduit in the ground so the electricians don't have to dig another trench!
Everything passed inspection and now on to the next thing. The plumbing company, SteadyFlow, was amazing! They were organized, clean, efficient and charged an appropriate amount. I highly recommend them for this type of work.
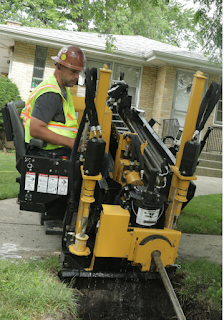
This is the machine that drilled a tunnel under my sidewalk to hook up my water from the street to my house. I was wondering how they were going to work around the sidewalk and my front yard.
I forgot to take a 'before' photo but this is what the yard looks like 'after' the sewer/water was installed. You can see the hook ups/pipes sticking out of the ground in the upper right. I had to get temporary fencing as the fence is going to have to come down and I don't want my neighbors and my dog to escape!
Tuesday, October 18, 2022
OCTOBER UPDATE!
The city approved the cottage so we can break ground at any time! Such exciting news.
First thing, getting the utilities worked out. My contractor filled me in on the process of making phone calls and having to fill out so many forms online. Apparently, doing things by phone is outdated. Seattle City Light (power company) needs all the info. on what type of heating unit and hot water tank I am going to install to make sure my cottage isn't pulling too much power away from the rest of the line. The same applies to the water company. They want to make sure my unit isn't pulling away too much water and taking away from the water source, especially from water for fighting fires. Makes sense to me, however, I find this interesting as I have to wonder if they give a shit about how much electricity and water the fucking apt complexes are pulling. I feel like developers get away with so much more than homeowners and our City Council blows! Yeah, I'll get off my soapbox.
My contractor and I are hoping to be able to dig one trench (where the sewer is) and put the electrical, water and sewer in the same trench. It would just be nice to have to dig once instead of a bunch and the neighbors and I need to replace our sewer line anyway so digging one trench makes sense.
Once we have the utilities lined up, we can pour the concrete for the slab that will be the base of the structure. Once those two things are done, things should go pretty quickly. There is a list of required inspections provided by the city and the first one is to have a pre-construction inspection. The city wants to have a look around on the property before I touch anything. I was surprised this wasn't part of the application process, so I guess application first then the inspections start.
That's it for now. I am going to make sure to keep my two neighbors apprised of each step as I know the process will be ass for a few months once things get rolling.
HOLY SMOKES! You may be wondering if my DADU...

-
UPDATE! UPDATE! It's hard to believe I haven't posted since April. It has been busy times for the backyard cottage. FLOORING I d...
-
ABOVE IMAGE: Instead of using a Tyvek type of rain barrier, we decided to go with a rain barrier that has a rubber base and can be painte...


