Saturday, June 12, 2021


OTHER OPTIONS


Our lovely neighbors Michael and Adam sent me a link with yet another backyard cottage option:   Accessory Dwelling Units - ADU | California And Washington | Abodu

This one is nice as it includes a general cost breakdown which includes the use of a crane which I will probably need to get materials into the backyard.  

Monday, June 7, 2021


DESIGN TIME!

Well, my financing came through and I have the money to get this party started!  I was able to take money from the equity of my house as I had already paid off half of the original mortgage from 2006.  Now I owe the bank pretty much what I bought the house for but...I did refinance and was able to get a 15 yr. fixed 2.5% interest rate!!!  My mortgage did go up $700 per month now that I owe more but that is affordable and I can get a renter in there paying at least that much so I am feeling solid and safe.  I'm telling you guys this so you have an idea of what options are out there in case you want to join the DADU party bus for your own property!

So, the one poopy thing is that my design team is wayyyy too expensive.  There is a design they are affiliated with that I love but they are unable to build it within the budget I have so...oh well.  I'm sad as their design is kick ass - drive along West Marginal Way (heading into West Seattle) and on your left, across from the garbage/dump on the Duwamish, you will see 3 very small old run down cottages.  Remember those?  They were part of an old Croatian fishing village along the river.  Well two retired tugboat captains bought them and are fixing them up.  One is a colleague of my design team, Ten Penny Studios, and I love what they have done with the places.  They call them The Three Little Pigs.  The completed one is 300 square feet on top of 300 square feet and is super cozy and beautiful and what I could legally put on my lot.  But, alas, too expensive.  I am still going to see if I can by the plans and then shop them around to other contractors.  My dream is to have Louise from Weezie's Plumbing do my build as she did my kitchen remodel and is on time, great rates and quality work!  We shall see.

However, Neighbor Tova did send me a link last year informing me that the City of Seattle has created a website with pre-approved DADU designs!  I checked it out at that time and was not loving the designs as they are quite modern and I have done modern in the past and I am now looking for a 'Norway cottage in the winter time' kind of a feel.  Here is the link so you can check out all of the pre-approved designs along with other design submissions:  https://aduniverse-seattlecitygis.hub.arcgis.com/pages/gallery  

I have a pretty big crush on the Central Collective model:  https://www.seattle.gov/Documents/Departments/OPCD/OngoingInitiatives/EncouragingBackyardCottages/DADU_Submission029.pdf     

My footprint can only be 490 sq. ft. so this could work and it looks like a Viking longhouse.  It also comes with a cost analysis breakdown which is pretty fantastic!  

That's it for now.  Will post update when there is news.      

Monday, May 24, 2021


CHERRY TREE CARCASS UPDATES


THE SAWDUST:


Once the Cherry Tree came down I put all of the sawdust that was created into my veggie/flower garden.  I must confess, I was shocked at how fruitful the area has become!  I have been trying all kinds of different natural fertilizers:  bat guano, algae, fish parts, compost from my worm bin, Cedar Grove Compost, wood ash, etc. and nothing has produced this kind of results.  That borage is huge, vast and tall along with other wildflowers!    


THE 'CROTCH' OF THE TREE:


Here are the bowls my buddy, John, created from the tree crotch and they turned out beautifully!  They are for eating food and I just have to rub a linseed oil/bees wax combo to keep them shiny and from cracking because of dryness.    

Friday, September 4, 2020

DRAWINGS ARE IN!

Tenpenny Studios dropped off 3 different design ideas for the backyard cottage.  The first is a one story studio with a loft.  Another is of a two story, two bedroom design and the third is of a one bedroom, single story option.  These are just the concept drawings and can be massaged and tweaked.  I am waiting on estimated cost per unit which will help with my final decision.  It is estimated to take 8-10 months start to finish which will suck for my neighbors to the north and south so also getting info. on how to navigate that.  

I am still trying to figure out how to upload the drawing(s) here so please be patient.  


WHAT TO DO WITH THE REST OF THE CARCASS?


What does one do with the rest of a tree carcass after it has been cut down and the majority of the wood milled?  Well, I am learning there are so many options.  The small branches are run through a chipper to create mulch and according to Seattle Tree Care they deliver the chipped wood to Seattle Parks/Rec. over at Magnuson Park where the parks dept. uses it all over the city.  If you would like some free mulch they will deliver the chipped wood directly to your house.  Here is a link for that:  https://getchipdrop.com/ref=ga&gclid=EAIaIQobChMI6fzMpo286wIVXiCtBh2_WghyEAAYASAAEgK0vPD_BwE  Be careful though - a friend did this and ended up with so much mulch that she put a shout out to her local Buy Nothing group.  

Turns out I can also keep and dry out the mulch to use in a smoker...cherry wood is good for that. 


According to my neighbor this part of a tree is great for making bowls.  I found out this y-section is called 'the crotch'.  I have a friend who is a woodsmith and asked if he would be open to making me a bowl.  He said 'yes' so I went to his workshop for a tutorial about what he will do with my wood.  Above is a photo of the lathe that he will use to make bowl. 

Above photo:  These are bowls that he has rough cut from various trees which are now drying on the shelf for one year.  He will use the lathe to make 2 bowls from my tree which will join these other bowls on the shelf to dry.  Yes, I am learning that working with wood means being patient as the wood dries...slowly...over time.  I can also use some of the leftover smaller pieces of wood to make handles for bottle openers, knives, etc.
 
This is my woodsmith friend, John.  He is also in a wheelchair so it was pretty great to see his set-up and how he manages to make it happen from the confines of his wheelchair.

In summary:  the wood can be used to mulch, make cherry wood chips for smoking meat, make bowls/handles and slabs for furniture, etc.  So many things.  Not to mention, I could have taken a cut of new growth from my tree before it was felled in order to grow a baby from it and keep the genetic line going.  I did not do this as I was so overwhelmed by the whole experience and could just not cram one more thing into my head.  Part of me now regrets it as that was a really powerful tree.    

Thursday, August 27, 2020

TREE MILLED AND CURING!


Whelp, here she is!  She has been milled and is now curing on the side of my house for 2 yrs.  Turns out I just leave her open like this (a small tarp on top to keep majority of rain off of her) to let the air flow through and dry her naturally over the course of 2 yrs.  I decided not to dry her in the kiln as my sawyer prefers this way of drying as it is less prone to cracking...slow and steady.


Also, some excellent news!  The tree was NOT 3,000 to mill...she was $400!!!  Talk about a misunderstanding.  When he mentioned $3000 he was referring to a HUGE tree he had hauled, milled and hauled again.  My little tree was nothing compared to that monster so imagine my surprise when he gave me the price.  So altogether it was $1,900 to take down and $400 hundred to mill.  After looking online at cherry wood live edge slabs for sale I probably broke even or even saved a few bucks as cherry wood this size is pretty pricey.  Either way, she lived a long life, gave to the world and is now going to keep on giving in some capacity in the little backyard cottage.  

Tuesday, August 11, 2020

GOING TO THE MILL

It happened.  After the tree came down the sawyer (what you call someone who mills trees - just learned this) came over to my house and painted the ends of all of the limbs so the tree wouldn't start drying out before being milled.  A week later he came back and collected the wood for milling.  He invited me to come and watch so I did!  I asked if I could bring a friend and he said yes, so I invited Kelly, who will be designing the backyard cottage.  I really wanted her to be a part of the process so she could get a feel for the tree and the wood and what she feels would be the best way to incorporate the wood into the new structure. 

Here are the big limbs that he is loading from his truck to his tractor to drive over to the saw.
This is the kiln used to dry wood a bit faster than naturally drying it.  The kiln uses hydrolic heat (110 degrees) to dry the wood.  He dried his wet clothes in there once when his dryer broke down.  I will be drying mine naturally (about 2 yrs outside) instead of using the kiln.  He prefers kiln when possible as it is a more natural, slow dry with better results.  
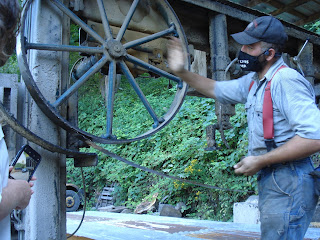
This is a 100 yr. old steel wheel from an old saw mill that he and the team repurposed and used to build their own large saw.  Turns out a lot of the machines are not made in a factory but built by the sawyers themselves.  These guys are tinker-ers/natural engineers who enjoy inventing and making things.  He is also wearing his BLM mask...very proud.  
Here is that large saw from another angle.  You can still see the steel wheel on your right.  This saw is for huge trees like the Douglas Fir he is standing in front of.  That tree is from a private collection he has been slowly milling for a customer.  This is hard work, takes time and there are so many customers and not that many sawyers.
This is the smaller, portable saw that he used to mill my tree.  
Here he is using his tractor to load a limb onto the saw.
Here the limb is just beginning to be cut.
Here the saw is half way through.  It is hard to see the blade but it's there.
Here you can see the cut line as the saw goes through the wood.
This is what my cherry tree looks like inside!  He said this is the most beautiful time to really see all of the colors as the wood is still wet.  It was pretty dry looking within 15 min. and not as vibrant...like a colorful rock in a river that dries out and looks dull. The moisture really evaporates quick.  
This is one of the limbs that grew crooked and I was curious/concerned how he was going to mill it.
Turns out he just laid it on its side with a giant hook on a wood handle.
This is what the wood looks like from that limb.  You can see how a branch had, at some point in the trees life, started growing and then eventually came off.
He pointed out to us the dark brown lines in this piece and informed us that this was damaged done to the tree bark when the tree was young.  Very fascinating.
This limb was not particularly big but still usable.  He was cutting down the middle so the two pieces are chunky.  They can be used as table legs.
This limb was also skinny and hard to cut on the portable mill without some support (it would jump around) so he used clamps to help support it on the machine while he made the cut.

Another view of the saw making a cut along the bottom of the limb to remove the outer layer of bark/skin.

Another cut using clamps.
Sawyers are naturalist too as they work with trees all day.  I asked what the weirdest thing he ever found in a tree was and he brought out this.  I got very excited and decided it was from the Clovis tribe and it's worth millions of dollars.  But, alas, no.  It is clearly forged and he believes it was from back in the day when lumberjacks would use spikes to help drag the wood to the river.  He figures this got trapped in the tree and it wasn't until he was milling the tree that he discovered it...cause it broke his blade!  You can see the clean, straight cut his blade made.  
He did show me a section of limb that he cut that appeared to have some rot.  I couldn't see any difference in the beautiful wood but then he had me touch it and it was spongy.  He said that section was no longer wood but a fungus or something.  He said that it was fine to go ahead and dry the wood and then whomever works the wood can use an epoxy to firm up that area and totally use the wood like nothing is wrong with it.  Very cool.  Once he has cut all the wood he will deliver it back to my place, stack it on the north side of my house (with spacers and a tarp on top) and I will have usable cherry wood in 2 years!  

                                                                                                HOLY SMOKES! You may be wondering if my DADU...