Monday, April 25, 2022

UPDATE TIME!


APRIL UPDATES!


It has been some time as me and my design team figure things out with regards to whether or not SIP panels are best or traditional stick construction.  Mariana, my architect, and I did visit the SIP factoring in Puyallup and learned a ton of stuff.  The walls are made of a special foam (which is manufactured across the street in another factory building from the main wall construction building which I appreciate as I prefer to buy Made in America) sandwiched between what is essentially chip board.  They glue the exterior wood and interior foam together and, viola, you have a wall.  The wall are 4 inches thick, and the roof is almost double that - heat rises and they want a thick ceiling/roof to keep the heat from leaving.  My structure only has a footprint of 240 square feet so my place would only take 3 days to make.  Image your walls, insulated and ready to go, in 3 days and require another 3 days to install on the site.  How clean and easy is that?!  I asked all of the questions that no one else had the answers to:

1.  I realize the walls are pre-built and set so can I still hang pictures or shelves?  Yes, the thickness of the walls is around 4 inches (chipboard/foam) plus the layer of sheetrock on the interior so plenty of thickness to screw in screws for hanging things without damaging the foam.  

2.  What about electrical?  Can just any electrician install a new outlet if I need an extra one later down the road that is not in the original building plan?  Yes, the foam walls are pre-installed at the factory with tubes running through them (they look like hollowed out foam swimming noodles kids use at the swimming pool.)  The tubes are located along routes within the walls that are specifically meant for electricians to cut into and pull conduit through...super easy and set up for electricians.  

3.  What if I want a new window installed someday down the road?  Will cutting into the wall effect the structural integrity of the structure?  Yes, I can have a window cut into the structure down the road.  HOWEVER, it needs to be done by a company that works with SIP paneled homes.  Not just anyone can work on these structures as they can most definitely damage a wall and fuck up the structural integrity of the entire structure and need to replace a whole wall which is expensive!  Can you imagine having to replace an entire wall of your house?  

4.  Can any contractor install these SIP panels when building a new home?  NO, you must have someone who works with this product and has been trained to install.  

5.  Plumbing?  I noticed foam tubing to run electrical conduit but what about plumbing?  Plumbing is going to be visible.  They cannot run plumbing inside the walls.  Plumbers are not allowed to cut into the walls to install plumbing.  So, unless there is cabinetry under the sinks to hide the plumbing, it will be visible.  The plumbing comes up through the floor not through the walls.  

6.  These panels are very airtight and do not breath.  Do I need to worry about mold?  No, the only area to worry about rot is the exterior.  If the exterior walls do not have an air flow between the walls and the siding, rot will occur which is bad because it isn't possible, like it is with a stick construction house, to remove the siding, cut the rot out and replace the siding.  With SIP panels you cannot cut out the rot, it will affect the structural integrity of the wall.  It is of utmost importance to hire a contractor who knows what the hell they are doing when it comes to creating that gap between the exterior wall and siding to allow airflow.  As far as the interior goes, all current construction requires internal ventilation so even though these walls are thick and do not breathe, there will be ventilation in the house somewhere required by law.

It felt good to go through the warehouse and explore the walls and the hardware.  I was actually pretty excited about SIP panels and thought I was going to go with them.  Mariana sent the factory our drawings and they returned an estimate for us.  It came in at almost $20,000 to build the walls - that is not including delivery/install.  Stick construction, insulation included, would cost almost half of that but I was really excited to have it all said and done in 3 days as I am also thinking about the inconvenience to the neighbors.  However, I then received an estimate from a contractor who works with the SIP company, and he wanted $20,000 to install the walls!  So, $40,000 for insulated walls on a 240 square foot structure so I said NO FUCKING WAY!  We are going with stick construction instead.  Yes, wood prices have gone up over the last 365 days, but I will still save a few thousand dollars that can be put into other parts of the structure. 

ESTIMATE FOR SIP PANELS CONSTRUCTION


ESTIMATE BY CONTRACTOR TO INSTALL DADU

Tuesday, January 25, 2022


UPDATE TIME

The Seattle Department of Construction and Development got back to me, and my official intake date is May 31st.  What the hell does that mean?  It means that my design team and I have to have every single detailed drawing, etc. submitted on that day.  Then the city goes over our plans and makes corrections (if needed) based on the rules of construction for the city of Seattle.  Other cities and towns have their own building standards and codes, so this process is unique to each location. 

I have been debating about whether or not to go with traditional stick construction vs SIP (Standard Insulated Panels).  They each have pros and cons.  I am going to a SIP manufacturer in Puyallup (Premier SIPs Building Solutions - Stronger. Straighter. Greener) for a tour of the plant and hope to get all of my questions answered as it seems architects/designers, green build peeps think the panels are great (long term energy efficiency) but can't answer any of my practical questions about long term care, install and retrofit possibilities.  I'm pretty excited for the tour and hope it helps me make a quick decision.  

I also plan on interviewing Puget Sound Solar (Solar Energy Solutions | Puget Sound Solar LLC) to find out if solar is truly beneficial or if it is about bragging rights.  I have a cabin in Ocean Shores and had a family-owned wind turbine install business come out to put together a quote for installing a wind turbine as the ocean is incredibly windy and wind power seemed a good idea.  They told me it would be $100,000 to install and $1,000 per year in maintenance (my place has 1,200 square feet of living space so not big.)  I said 'no fucking way' as that amount is bullshit...it would never pay for itself.  There are companies in California that are installing wind power in neighborhoods for $8,000 per house and that was 20 yrs ago.  I guess we need more family-owned businesses doing this kind of work in order to throw off those monopolies.  I am still not sure if install fees, maintenance fees and replacement fees are worth the cost of installing solar panels.  If it costs $10,000 to install, $500 or more for yearly maintenance and $10,000 to replace panels and I only make $300 per year in energy-buy-back from the city and some kind of one-time small energy efficiency tax rebate, then how is that economic?  At that point it is just bragging rights and not worth it to me. 

Remember those crusty old doors I told you about a few months back?  Well, Alberto is here, and he is making those doors beautiful again.  These are the two doors I saw leaning against the house of one of our neighbors on 22nd.  They sold them for me for $25 each but I paid $50 each because these doors are amazing, and I am looking forward to seeing what they look like when Alberto is finished with them.  My stain-glass lady is ready and starting the stain-glass art which will replace the glass that is currently in the doors.  So cool!  Below are images of what the doors look like now and I will post what they look like when Alberto is finished with them and then again when the stain-glass is installed.             


Thursday, December 23, 2021

3D RENDERS ARE IN!


We have sent in the intake pre-site visit application with Seattle Department of Construction and Development.  There is an application fee = $173.25.  I was expecting it to be more expensive based on the cost of anything construction related in Seattle!

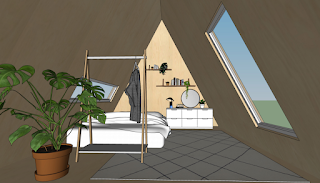
Here are the 3D renders.  Very excited and liking the design/layout.  We are still trying to figure out appliances.  I discovered that an electrical tankless hot water heater pulls so much electricity it needs it's own powerline from the street!  This sucks as it means I need to ask about getting gas run to the backyard which I am not sure is going to be allowed.  Apparently, Seattle is not allowing gas lines to be run to new construction...they are phasing it out.  So, I may need to get a small hot water heater (tank) which sucks as they eat up square footage.  Homework to be done.

ABOVE:  This would be the view of the cottage from my back deck...we will be staring at each other.  The big ass fig tree will be our natural privacy barrier (fig tree not pictured).


ABOVE:  As you can see, this unit has a loft area for a bed or storage.

ABOVE:  The ladder will be on a track like a library ladder but will also be able to be removed.
ABOVE:  The sky light will be a pop-out for ventilation and fire evacuation.  

Again, this is a small 240 square foot structure with a loft space.  It will have very little storage and truly meant for a single minimalist.  After having so many different people live in my tiny shed I realized there is a market for people who enjoy small spaces and do not want a lot of 'stuff'.   

Thursday, December 2, 2021


Hello Neighbors!  So, I have officially chosen a design team and their design.  I am working with Central Collective, LLC (https://www.central-collective.com/contact) whom I found via the Seattle.gov. preapproved dadu website (https://aduniverse-seattlecitygis.hub.arcgis.com/pages/gallery) Neighbor Tova passed on to me.  I really like the Viking longhouse look (https://www.central-collective.com/architecture/75k-dadu), it is small enough for my backyard, isn't too modern looking and...it's the right price!  This is a female/queer owned business and I would like to support our minority business owners until they are no longer considered 'minority' and are seen as equal and experiencing equity.  This also includes working with as many minority contractors, etc. as possible.  

The team and I did change the floor plan than the one seen on their website.  They came up with 3 designs and then we decided on a 4th that was more collaborative with what I am looking for as far as a living space goes.  


We expanded the bathroom a little bit to accommodate someone in a wheelchair using the bathroom.  I also want to include a small wood burning stove to create ambiance as the space is small and will need a  couple of visual accents to make it a more dynamic space instead of a boring tiny house.


You may be wondering, "What kind of a dumbass puts a woodstove in new construction in the city?!"  That is a fair question as I have asked myself the same thing.  I really enjoy the feel of a wood burning stove.  My goal with this space is to create a warm, cozy space...Norway in the winter time.  I really, really, do not want a cold, modern space so I am looking for ways to create that warm vibe.  I decided against running a gas line out to the cottage and installing a gas wood stove because gas is becoming obsolete and I don't want to pay to have a line run to my backyard.  Whomever lives in the cottage will be instructed that the woodstove is only allowed to be used on rainy winter days as there tends to be burn bans in the city in the winter due to smog build up if the rains aren't showing up.  Don't worry, this is not the cottages' only source of heat.  I am not allowed to build a new structure without a secondary source of heat.  I am installing that tiny little heat pump/AC up on a wall. The woodstove is not meant for everyday heat use in this space.  Again, that is just for ambience.   


The second accent I am including to create a warm feeling includes using salvaged wood (from Reverend Buckley's house) and stain glass for the wall separating the bathroom from the living space.  I found two old-school wooden doors at one of our neighbors down on 22nd.  Alberto, who painted my house this summer with his colleague, Marvis, is going to refinish the doors and I am very excited to see how they turn out as I believe the wood underneath the grime and age are beautiful.  I will remove the glass panels in each door and replace them with stain glass that is being made by a female owned stain glass business in Burien (http://www.glassexpressions.com/)  The two doors will be installed barn style and will be the doors used to access the bathroom.  For one of the glass panels I have chosen an image that reminds me of my childhood: a 1970's vintage water bed sheet image:


As far as the image for the second door...I have given the stain glass team artistic license to make what they want as I think artists like to be cut loose and create and it makes it fun for me to see what they come up with. 

Now that the floor plan has been picked out, we will start on where to put doors and windows.  As it turns out, when designing a small space (240 sq. ft.) we need to know EXACTLY where everything is going as there is no room for error.  I had to figure out where I wanted the couch and then find the couch I want, measure it and incorporate where it would go and that is the spot where the couch will always be...for all time.  Now that we know where kitchen counters are going, woodstove, couch, table/chairs, we can decide the best place for windows and doors. I am definitely have skylights installed; two on each side of the sloping roof.  One of which will be a pop-out in case someone is sleeping in the loft and needs to escape a fire from below (my idea by the way - architects are not necessarily practical, functional minded people.)  I do like the porthole window they have in their initial website design and I am thinking the northside of the cottage (Lori Reynolds side) may be a good place for that.  The team has also finished a 3D rendering of the floor plan so I can have a better feel for what the space will be like.  

We are now at a point when we can submit the plans to the city so we can apply for an intake date.  Whatever the hell that means.  I will find out and then let you know!      


Saturday, June 12, 2021


OTHER OPTIONS


Our lovely neighbors Michael and Adam sent me a link with yet another backyard cottage option:   Accessory Dwelling Units - ADU | California And Washington | Abodu

This one is nice as it includes a general cost breakdown which includes the use of a crane which I will probably need to get materials into the backyard.  

Monday, June 7, 2021


DESIGN TIME!

Well, my financing came through and I have the money to get this party started!  I was able to take money from the equity of my house as I had already paid off half of the original mortgage from 2006.  Now I owe the bank pretty much what I bought the house for but...I did refinance and was able to get a 15 yr. fixed 2.5% interest rate!!!  My mortgage did go up $700 per month now that I owe more but that is affordable and I can get a renter in there paying at least that much so I am feeling solid and safe.  I'm telling you guys this so you have an idea of what options are out there in case you want to join the DADU party bus for your own property!

So, the one poopy thing is that my design team is wayyyy too expensive.  There is a design they are affiliated with that I love but they are unable to build it within the budget I have so...oh well.  I'm sad as their design is kick ass - drive along West Marginal Way (heading into West Seattle) and on your left, across from the garbage/dump on the Duwamish, you will see 3 very small old run down cottages.  Remember those?  They were part of an old Croatian fishing village along the river.  Well two retired tugboat captains bought them and are fixing them up.  One is a colleague of my design team, Ten Penny Studios, and I love what they have done with the places.  They call them The Three Little Pigs.  The completed one is 300 square feet on top of 300 square feet and is super cozy and beautiful and what I could legally put on my lot.  But, alas, too expensive.  I am still going to see if I can by the plans and then shop them around to other contractors.  My dream is to have Louise from Weezie's Plumbing do my build as she did my kitchen remodel and is on time, great rates and quality work!  We shall see.

However, Neighbor Tova did send me a link last year informing me that the City of Seattle has created a website with pre-approved DADU designs!  I checked it out at that time and was not loving the designs as they are quite modern and I have done modern in the past and I am now looking for a 'Norway cottage in the winter time' kind of a feel.  Here is the link so you can check out all of the pre-approved designs along with other design submissions:  https://aduniverse-seattlecitygis.hub.arcgis.com/pages/gallery  

I have a pretty big crush on the Central Collective model:  https://www.seattle.gov/Documents/Departments/OPCD/OngoingInitiatives/EncouragingBackyardCottages/DADU_Submission029.pdf     

My footprint can only be 490 sq. ft. so this could work and it looks like a Viking longhouse.  It also comes with a cost analysis breakdown which is pretty fantastic!  

That's it for now.  Will post update when there is news.      

Monday, May 24, 2021


CHERRY TREE CARCASS UPDATES


THE SAWDUST:


Once the Cherry Tree came down I put all of the sawdust that was created into my veggie/flower garden.  I must confess, I was shocked at how fruitful the area has become!  I have been trying all kinds of different natural fertilizers:  bat guano, algae, fish parts, compost from my worm bin, Cedar Grove Compost, wood ash, etc. and nothing has produced this kind of results.  That borage is huge, vast and tall along with other wildflowers!    


THE 'CROTCH' OF THE TREE:


Here are the bowls my buddy, John, created from the tree crotch and they turned out beautifully!  They are for eating food and I just have to rub a linseed oil/bees wax combo to keep them shiny and from cracking because of dryness.    

                                                                                                HOLY SMOKES! You may be wondering if my DADU...